Add-on: Paxton Net2
The Paxton Net2 Add-on connects Storeganise to your on-premise Paxton Net2 access control system, automating door access throughout the entire customer lifecycle. When a customer moves in, their Paxton user account is created and access is granted automatically. When they move out or fall overdue on payments, access is revoked immediately — no manual intervention required.Because Paxton Net2 runs on your local network rather than in the cloud, the Add-on uses a secure ngrok tunnel to bridge Storeganise to your on-premise Net2 server. This tunnel is set up once during installation and runs continuously in the background.Note: To install the Paxton Net2 Add-on, contact support@storeganise.com.
Fobs and key cardsThe Paxton Net2 Add-on supports fobs and key cards as access credentials. When a customer moves in, the Add-on automatically generates and assigns a PIN to their Net2 user account. If you also want the customer to access the facility using a fob or key card, you can assign one to their user account directly in the Paxton Net2 dashboard. Fob and key card enrolment is handled entirely within Paxton Net2 and has no effect on Storeganise. Nothing will appear or change on the unit rentalWhen a customer moves out or is locked out due to an overdue payment, the Add-on revokes their door permissions at the user level. This removes access for all credential types associated with that user — including any fobs or key cards enrolled in Net2 — so no separate action is needed.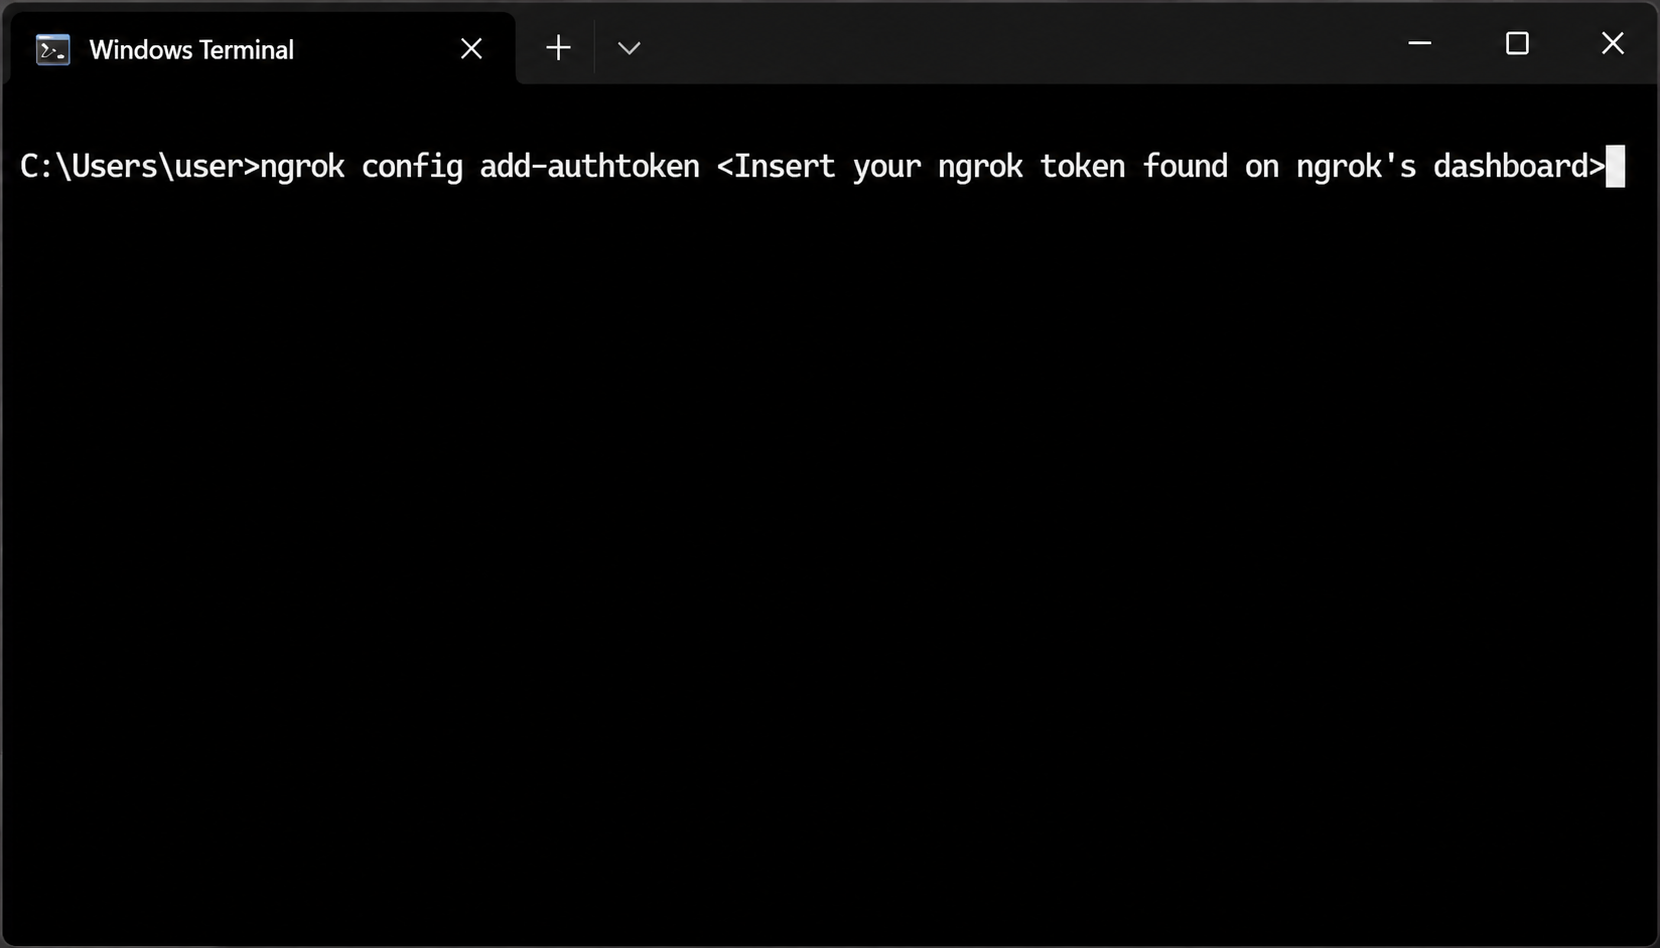
 Important: On free ngrok plans, this URL changes every time you restart the ngrok agent. If your URL changes, you must update the Paxton URL field in your Add-on settings immediately — otherwise the Add-on will lose connection to your Net2 server. To avoid this, upgrade to a paid ngrok plan with a reserved domain.
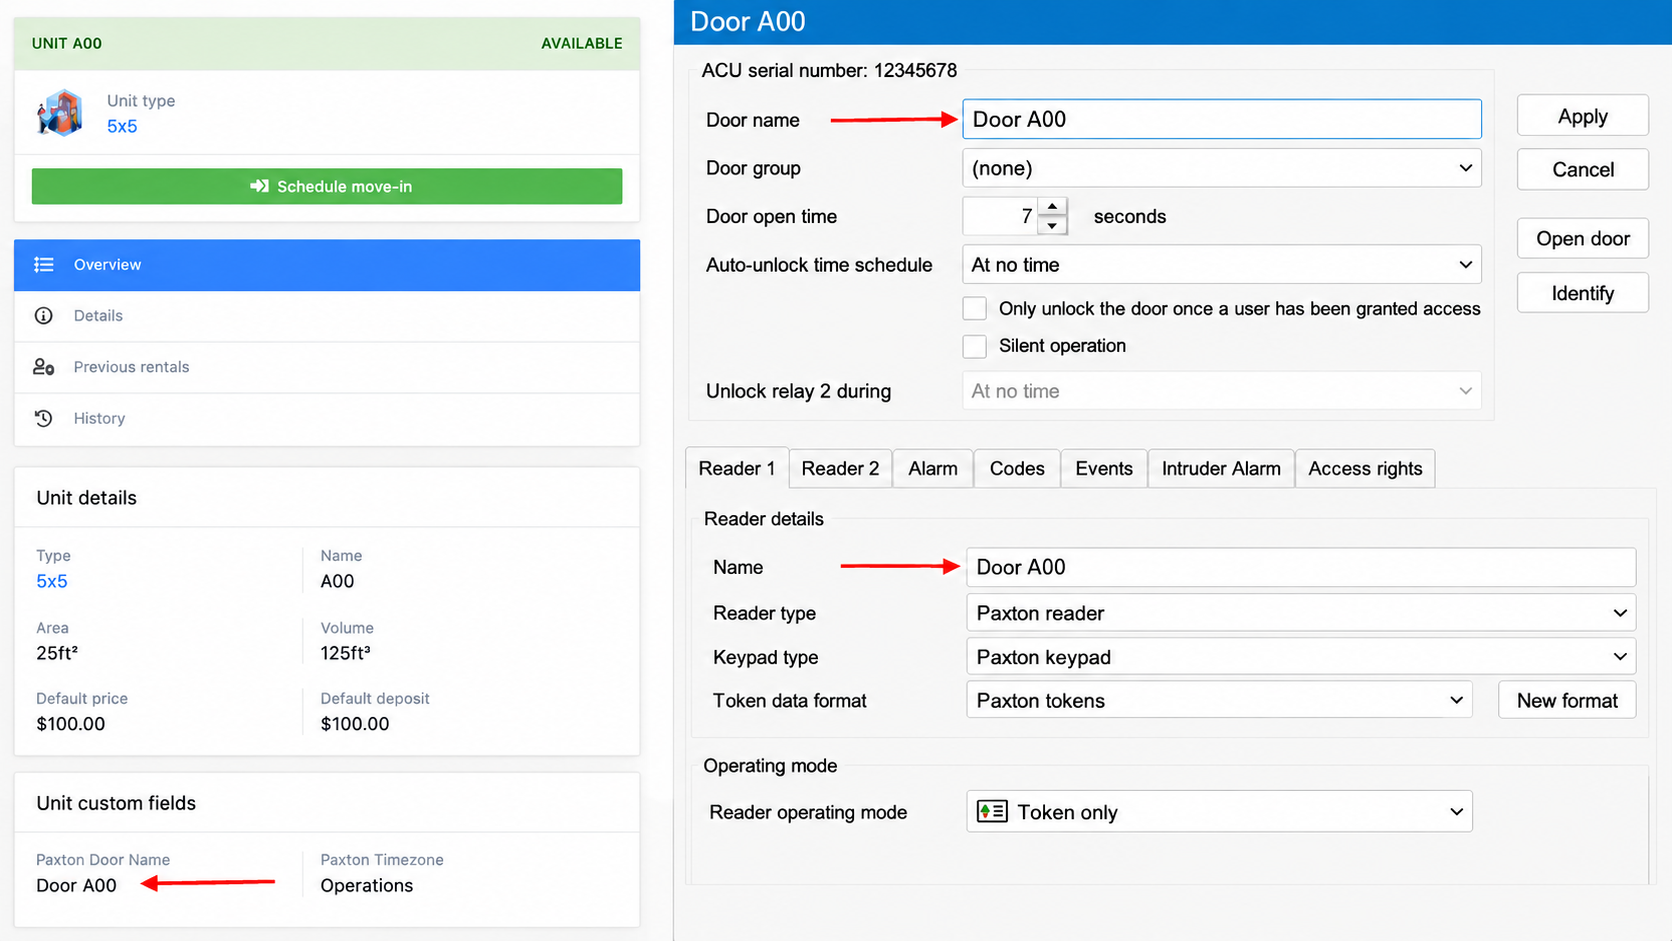
Before you start
Before configuring the Add-on, make sure you have the following ready:- A Paxton Net2 system installed and running at your facility
- Doors and timezones already configured in Paxton Net2 — these cannot be created via the API
- An ngrok account with a tunnel configured to expose your Net2 server (see Setting up ngrok below)
- Your Paxton API credentials: username, password, and client ID (your Paxton licence key)
How access works
The Add-on uses a two-level access structure that mirrors how Paxton Net2 is designed:- Shared facility access — Access points that all customers at a site can use, such as the main gate, lobby door, or elevator. These are configured once at the site level.
- Individual unit access — The door for a customer's specific storage unit. Each customer is granted a personal door permission for their own unit only.
Setting up ngrok for Paxton Net2
Storeganise runs in the cloud; your Paxton Net2 server runs on your local network. To allow Storeganise to communicate with it, your Net2 server needs to be made publicly accessible via a secure tunnel. ngrok is the tool that creates this tunnel.Note: ngrok is a third-party service with its own pricing. Plans start at approximately $8/month for a single site or $20/month for multiple sites. See current pricing at ngrok.com/pricing.
Create an ngrok account
- Go to ngrok.com and create an account.
- After signing in, go to Your Authtoken in the ngrok dashboard.
- Copy your authtoken — you will need it in the next step.
Install and configure the ngrok agent
Important: The ngrok agent must be installed on the same Windows machine that is running your Paxton Net2 server. It will not work if installed on a different machine.- Download the ngrok agent from the ngrok download page.
- Install the agent on the Windows machine running your Paxton Net2 server.
- Open a command prompt and run the following to authenticate:
ngrok config add-authtoken YOUR_AUTHTOKEN
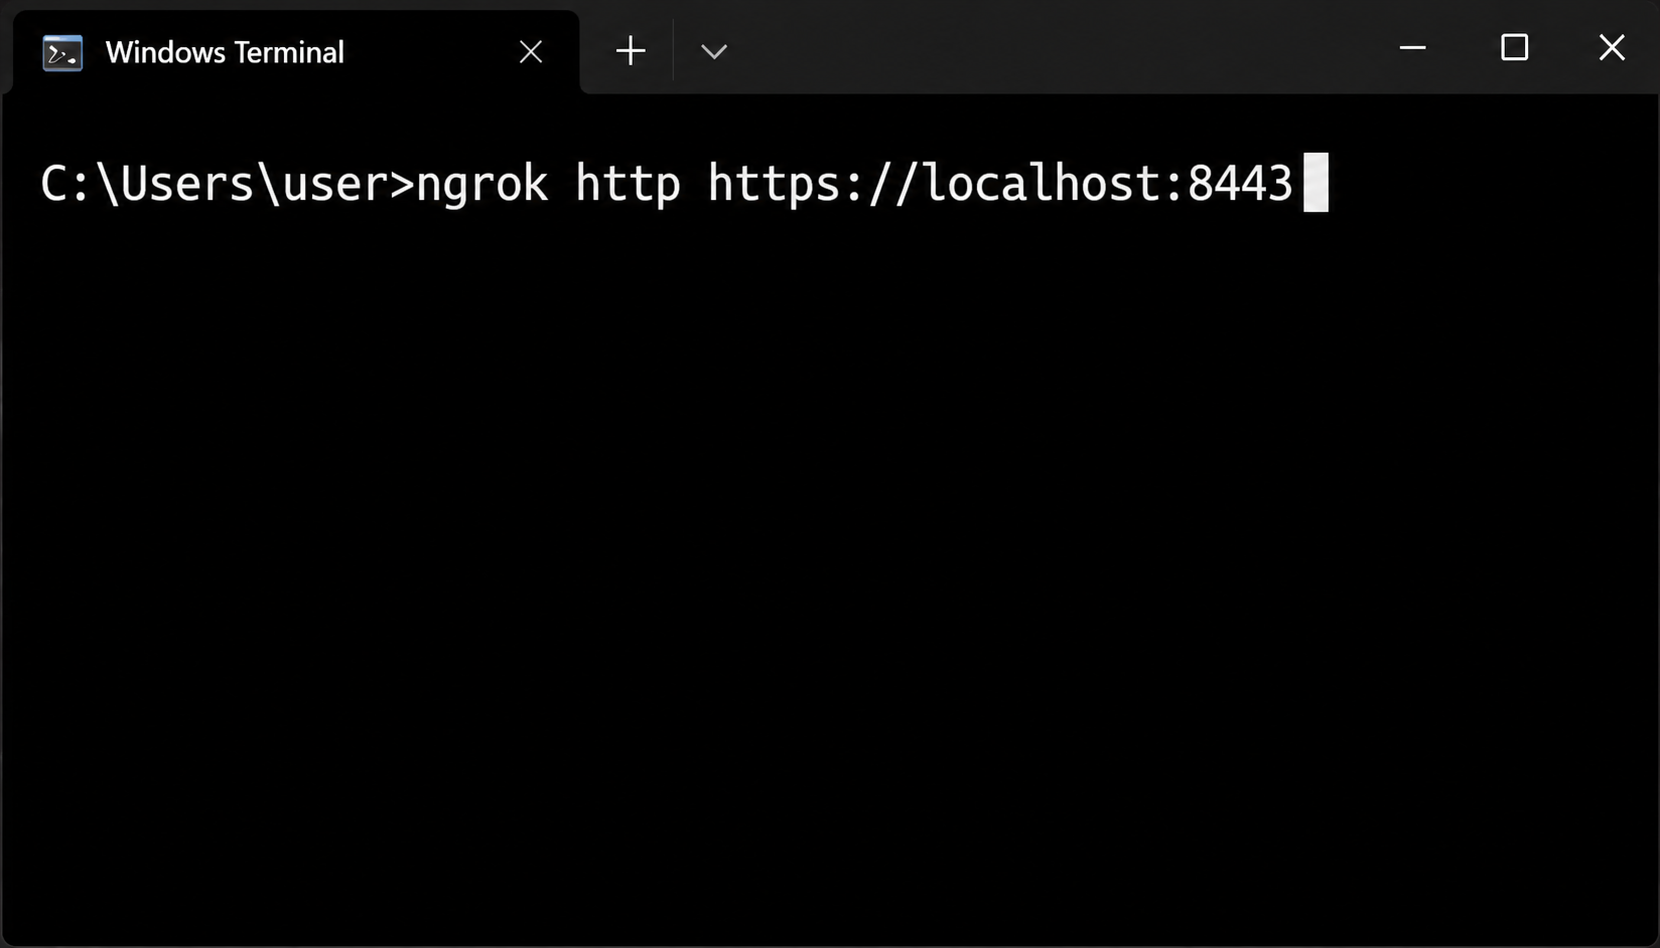
- Start ngrok to expose your Net2 server. The default Net2 port is
8443:
ngrok http https://localhost:8443
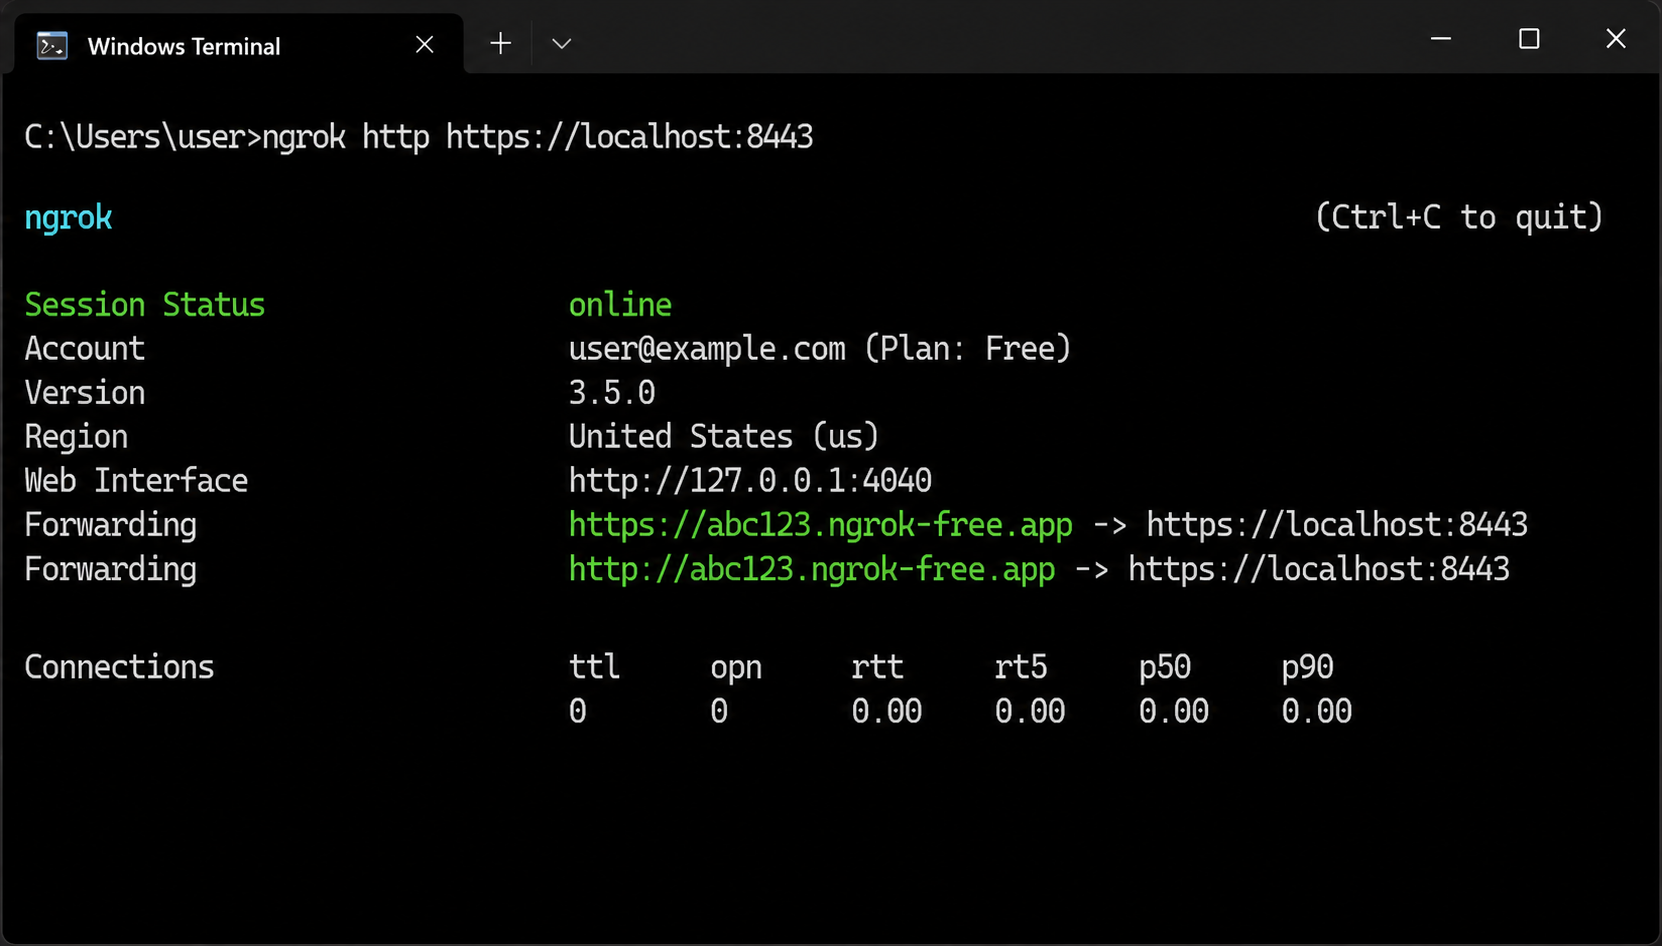
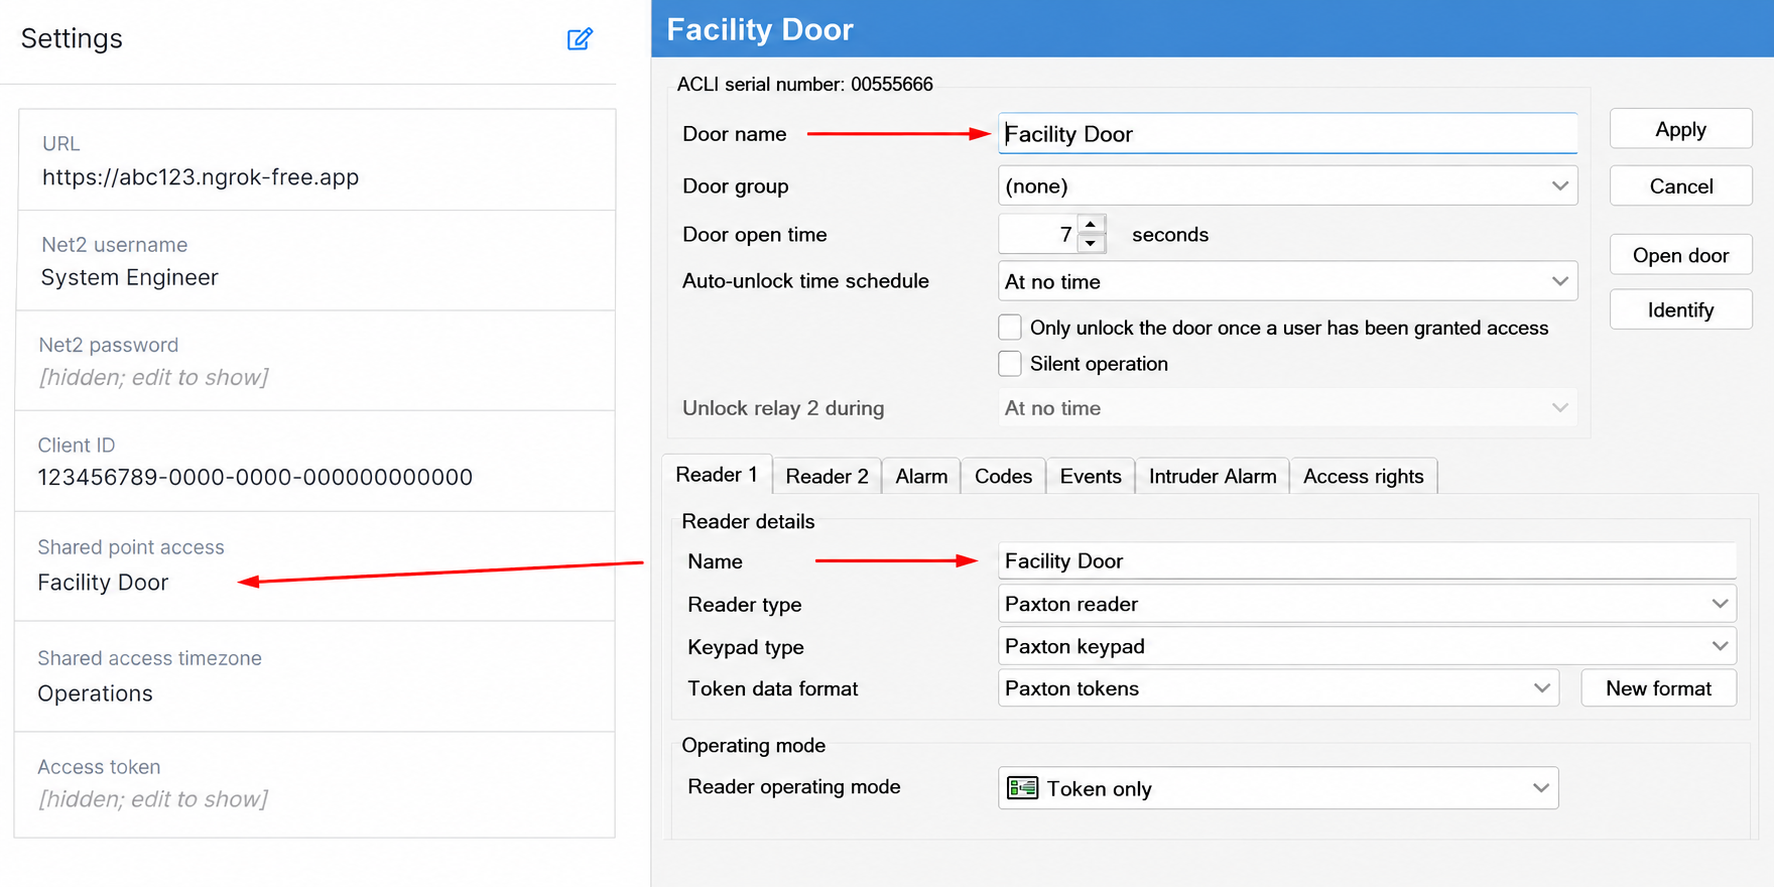
- ngrok will display a public HTTPS URL — for example,
https://abc123.ngrok-free.app. Copy this URL; you will need it when configuring the Add-on.
Keep ngrok running
ngrok must be running at all times for the Add-on to function. We recommend configuring ngrok to start automatically with Windows by adding it as a scheduled task or a system service, so it restarts after reboots without manual intervention.Configuring the Add-on
Once the Add-on has been installed by Storeganise, configure it at the site level.- In the Storeganise Admin Portal, go to Sites and select your site.
- Navigate to Add-ons and open Paxton Net2.
- Enter the following credentials:
- Paxton URL — The public ngrok URL from your ngrok setup (e.g.
https://abc123.ngrok-free.app). Do not include a trailing slash. - Username — Your Paxton Net2 API username.
- Password — Your Paxton Net2 API password.
- Client ID — Your Paxton licence key.
- Paxton URL — The public ngrok URL from your ngrok setup (e.g.
- Click Save.
Mapping doors to units
Before the Add-on can grant unit-level access, each unit must be mapped to the corresponding door in Paxton Net2. Doors must already exist in your Paxton system — they cannot be created via the API.The door name you enter in Storeganise must match the door name in Paxton Net2 exactly. This match is not case-sensitive, but any spelling differences or extra spaces will cause provisioning to fail.Set a door name on an individual unit
- Go to Admin → Units and open the unit.
- Find the Paxton door name custom field.
- Enter the door name exactly as it appears in Paxton Net2.
- Click Save.
Set door names in bulk
If you have many units to configure, use the bulk import method:- Go to Admin → Units and export your unit list.
- In the spreadsheet, fill in the Paxton door name column for each unit.
- Re-import the spreadsheet — all door mappings will be updated at once.
Configuring shared facility access
Shared facility access points — such as the main gate, elevator, or lobby — should be listed in the Add-on settings so all customers are automatically granted access to them on move-in.- In the Storeganise Admin Portal, go to Sites → [Site] → Add-ons → Paxton Net2.
- Find the Shared access points field.
- Enter the names of the shared doors, separated by commas (e.g.
Main Gate, Elevator, Level 1 Lobby). Names must match your Paxton Net2 door names exactly. - Click Save.
How access is managed automatically
Once the Add-on is configured and doors are mapped, the following workflows run automatically.Move-in
When a customer completes a move-in:- A user account is created in Paxton Net2 using the customer's name, email, phone number, and address. If the customer already has a Paxton account from a previous rental, the existing account is reused — no duplicate is created.
- A PIN is automatically generated for the customer and assigned in Paxton Net2. The PIN is stored on the unit rental and is visible to the customer in the Customer Portal.
- Individual door permissions are created for each of the configured shared access points.
- An individual door permission is created for the customer's specific unit door.
Move-out
When a customer completes a move-out:- Their unit door permission is revoked.
- All shared facility door permissions are revoked.
- If this was their last active unit at the site, their Paxton user account is deleted.
- All Paxton fields are cleared from the unit rental.
Overdue payments
When a customer's rental is marked overdue:- All door permissions are revoked across all of their active units, including shared facility access.
- Their Paxton user account is retained — it is not deleted, so access can be restored quickly.
- All door permissions are restored, including shared facility access.
- Access is restored immediately.
Profile updates
When a customer's name, email, phone number, or address changes in Storeganise, the change is automatically synced to their Paxton Net2 user record. Existing access permissions are not affected.Manual overlock
You can manually revoke a customer's door access at any time — for example, during a dispute, maintenance work, or a security concern — using the Paxton manual overlock field.Applying a manual overlock
- Go to the customer's Unit rental page.
- Find the Paxton manual overlock field and set it to enabled.
- Click Save.
Removing a manual overlock
- Go to the customer's Unit rental page.
- Set Paxton manual overlock to disabled.
- Click Save.
Manual overlock and multi-unit customers
If a customer has multiple active units:- Overlocking one unit revokes access to that unit's door only. The customer retains access to shared facility areas and their other units.
- To lock a customer out of the facility entirely, you must enable Paxton manual overlock on all of their active unit rentals.
Re-syncing existing rentals
If the Paxton Add-on is enabled on a site that already has active rentals, those existing customers will not have Paxton access data stored in Storeganise. This means the Add-on cannot automatically manage overdue lockouts, move-outs, or manual overlocks for those customers until their access data has been imported.Use the Paxton resync field to import access data for an existing rental.Important: For re-sync to work, the following must be true:- The unit must have a Paxton door name configured.
- The customer's email address in Storeganise must match their email address in Paxton Net2 exactly.
Re-sync a rental
- Go to the customer's Unit rental page.
- Find the Paxton resync field and set it to enabled.
- Click Save.
Unit transfers
When a customer transfers from one unit to another, the Add-on automatically:- Grants access to the new unit's door.
- Revokes access to the original unit's door.
- Stores the customer's PIN on the new rental — their PIN does not change.
- Clears all Paxton fields from the old rental.
Troubleshooting
Access was not granted on move-in
Check the unit rental for any operator tasks — these will explain what went wrong. Common causes:- The unit has no Paxton door name set, or the name does not match a door in Paxton Net2.
- The ngrok tunnel is not running or has changed URL.
- The Add-on credentials are invalid — save the Add-on settings again to trigger a re-authentication attempt.
Access was not revoked on move-out
Check the unit rental for operator tasks explaining why revocation could not be completed automatically. If the rental was never provisioned via the Add-on (for example, the customer moved in before the Add-on was enabled), use the Paxton resync field to import their access data first, then contact support to re-trigger revocation.The Add-on is not authenticating
- Confirm your ngrok tunnel is running and the URL in Add-on settings → Paxton URL is current.
- Verify your Paxton username, password, and client ID are correct.
- Re-save the Add-on settings to trigger a fresh authentication attempt.
- If you see a
paxton_networkUnreachabletask, the Add-on can reach the ngrok URL but the tunnel cannot connect to your Net2 server — confirm that Net2 is running and that the port (8443by default) is correct in your ngrok command.
A customer's PIN is not showing
If the Paxton PIN field is empty after move-in or re-sync:- Check the unit rental for a task — it will explain whether no PIN was found in Paxton Net2 or whether PIN assignment failed.
- Set a PIN manually for the customer's user account in Paxton Net2.
- Use the Paxton resync field on the unit rental to pull the PIN into Storeganise.
A shared access point is not being recognised
If you see apaxton_invalidSharedDoors task on the Add-on after saving:- One or more names in the Shared access points field do not match any door in Paxton Net2.
- Check for spelling differences, extra spaces, or punctuation.
- Correct the names and save the Add-on settings again — the task will clear automatically if all names are valid.
Custom fields reference
The following custom fields are created by the Paxton Add-on and can be viewed on unit and unit rental pages.| Field | Location | Purpose |
|---|---|---|
| Paxton door name | Unit | The door name in Paxton Net2 that corresponds to this unit. Must match exactly. |
| Paxton user ID | Unit rental | The customer's user ID in Paxton Net2. Set automatically on move-in; cleared on move-out. |
| Paxton permission ID | Unit rental | The ID of the customer's individual door permission. Used internally for reliable revocation. |
| Paxton PIN | Unit rental | The customer's access PIN. Visible to the customer in the Customer Portal. |
| Paxton manual overlock | Unit rental | Toggle to manually revoke (enabled) or restore (disabled) a customer's door access. |
| Paxton resync | Unit rental | Trigger to import access data for an existing rental from Paxton Net2. Clears automatically after use. |
Jump to